Events in Table Maintenance
Scenario: We have a following custom table which contains the fields “Date on which record was created” and “Name of the person who created the object”. We would like to have these to be filled up with SY-DATUM and SY-UNAME respectively. 
Go to Table Maintenance Generator: 
Enter the details as shown below:
Now click on Environment -> Modification -> Events 
Following screen is displayed.

Click on F4. Following entries are displayed:

Here you can observe that there are different types of events available like before saving the data, after saving the data, before deleting, after deleting and others. Let us go with “Creating a new entry”. 
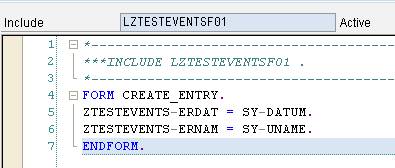
Click on the button in the Editor column and enter the following code: (Please note that you should also code FORM and ENDFORM as well).

Save and activate the table.
Testing the scenario:
Go to SM30 and try creating new entries. Do not enter the values for “Created on” and “Created by”. 
Check your entries in the database table. You can observe that the date and user name are automatically filled-in. See the screenshot below:

Some more Details
Modify your SAP database table maintenance events, screen, interface and code
Once you have created your basic SAP database tableand then added a standard table maintenence to it you may find that you want to change the functionality of it slightly. I.e. you may want to display a message when the data is saved or prevent users from saving certain combinations of data.
Step 1 – Modification options
SAP provides standard functionality for this purpose and is within the table maintenance create/change screen. Just to re-cap how to get to this, execute transaction SE11, enter your table name and press the change button. Within the next SE11 screen goto the menu option 'Utilities->Table Maintenance Generator'. The modifiction options are then within the menu option 'Environment->Modification'. Here you will see that you can modify the screens, interface, events and source code. For this example I am going to show you how to modify and event, the SAVE event to be specific. So when the user presses the save button with t-code SM30 for this table it will process this additional functionality automatically. 
Step 2 – Access the event modification screen
Select the menu option Environment->Modification->Events, you will see the following screen which will show the list of events that have been modified. It should be blank as this is the first time in. 
Step 3 – Create event modification
Click on the New entries button and use the F4 dropdown help on the first field to select the event you want to modify. You will see that there is quite a few that you can use such as before save, after save, before delete, when creating an entry etc... Select 01 (Before saving the data in the database). 
Enter 'SAVE_DATA' as the form name for your event modification and press enter. Note you can give this any name you want. 
You should also notice that you get an editor button in the third column, click this. You will then be asked to choose an existing include or create a new one for your code. Just keep the default as 'New Include' and press the green tick. Also click ok on the warning screen about an include statement being inserted. 
Step 4 – Add code to event modification
You will now be presented with a blank include page where you can add the code for your event. 
Its now time to add your ABAP code but remember you also need to add the FORM...ENDFORM code to match the form you endered on the modification screen i.e. SAVE_DATA 
In this example I am simply going to display a message with some text and the value stored in field1 using the following ABAP code. I have tried to use a message class and number that should be in your system but if you have any problems use a message class you know exists in your system.
FORM SAVE_DATA.
message i899(H1) with 'Data has been saved' ztest_table-field1.
ENDFORM. 
Step 5 – Save and Activate
Save and activate your include, then use the back button to return to the event modification screen and save that.
Step 6 – Execute
Now go to the table maintenace via SM30, change an entry in the table and press save. You should see you new message appear. 